Creating project
The Project module is a fundamental element of our product, designed to empower users to create projects within designated categories. This comprehensive documentation outlines the essential steps within this module to effectively structure projects and establish a hierarchical organization of documents.
The Project module allow users to establish projects within specific document categories. By creating well-structured projects, users can establish a clear document hierarchy that includes categories, projects, and document subtypes.
Key Features of the Project Module
The Project Module encompass the following key features:
Project Establishment: The module empowers users to create distinct projects within designated categories.
Hierarchical Organization: Users can establish a well-defined hierarchy that encompasses categories, projects, and document subtypes.
Note:
If you encounter any issues, contact your system administrator.
Accessing Project
To access the Project page, follow these steps:
-
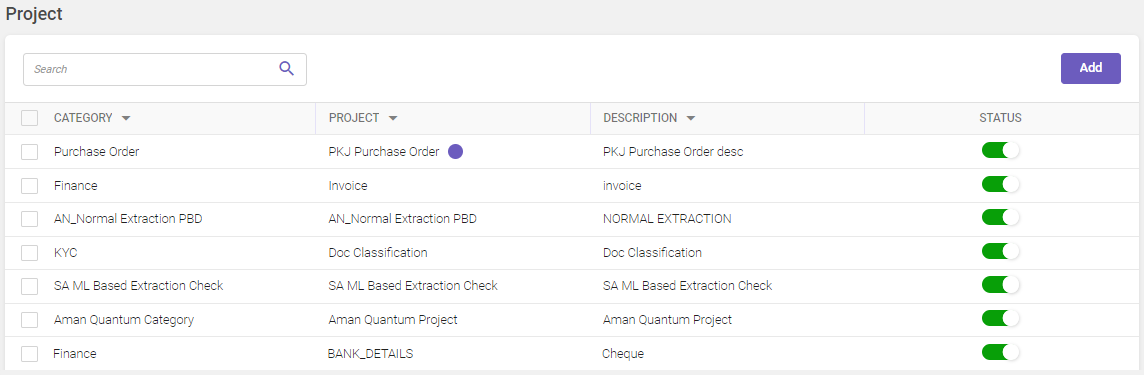
In the main menu, under Document Definition, click Project. The Project page opens.

Column header descriptions
COLUMN NAME
DESCRIPTION
Category
Displays the category name.
Project
Displays the project name. More
 The
 icon indicates that the particular project is an integrated project.
Description
Displays the project description.
Status
Displays the active/inactive status of the project.
Adding project
To add a project, follow these steps:
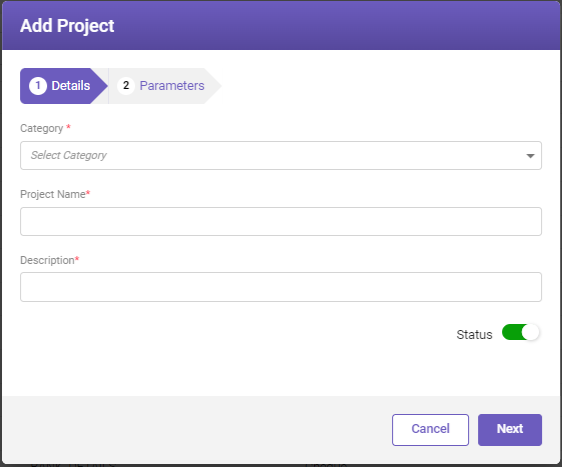
In the top-right corner of the Project page, click the Add button. The Add Project window opens with two tabs Details and Parameters.
Click on the buttons inside the tabbed menu to know more.
Under Details tab, fill-in the details based on the following field descriptions.
|
FIELD |
DESCRIPTION |
|---|---|
|
Category* |
Select the desired document category from the dropdown list to associate it with the new project. |
|
Project Name* |
Enter a name for the project. |
|
Description* |
Enter a description for the project. |
|
Status |
Enable the toggle button to make the defined project available. |
|
* Mandatory fields |
|
Once you've filled in the details, click Next to proceed to the Parameters tab.
Note:
It is mandatory to fill in the required fields under the Details tab before accessing the Parameters tab.
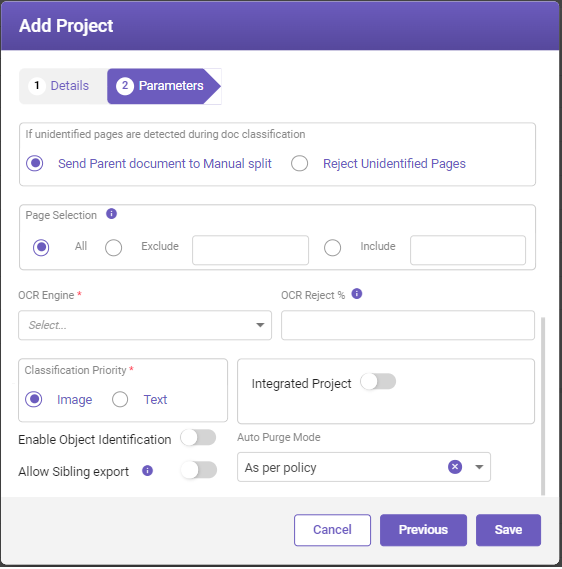
Under Parameters tab, fill-in the details based on the following field descriptions.
|
FIELD |
DESCRIPTION |
|---|---|
|
If unidentified pages are detected during doc classification |
Select the required option to either send the parent document for manual splitting or reject the unidentified pages. See Adding document subtype to know more about document class. |
|
Page Selection |
Specify the page number or page range to include or exclude from processing. Available options
ALL: To sent the complete document for processing. EXCLUDE: To exclude particular page or range of pages from processing. INCLUDE: To include particular page or range of pages for processing. You can specify the page range in the below format:
Note Page selection defined at subtype level will override that defined at project level. |
|
OCR Engine* |
Select the OCR engine from the drop-down list for processing the documents. |
|
Set the threshold percentage for detecting invalid characters. Documents exceeding this percentage will be processed as images. For example |
|
|
Select the required option to prioritize extraction during document classification based on document type. Available options are Image and Text. |
|
|
Integrated Project |
Enable the toggle button to define inter-document validations for heterogeneous documents. For more details, refer Integrated documents processing. Note
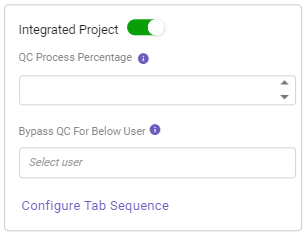
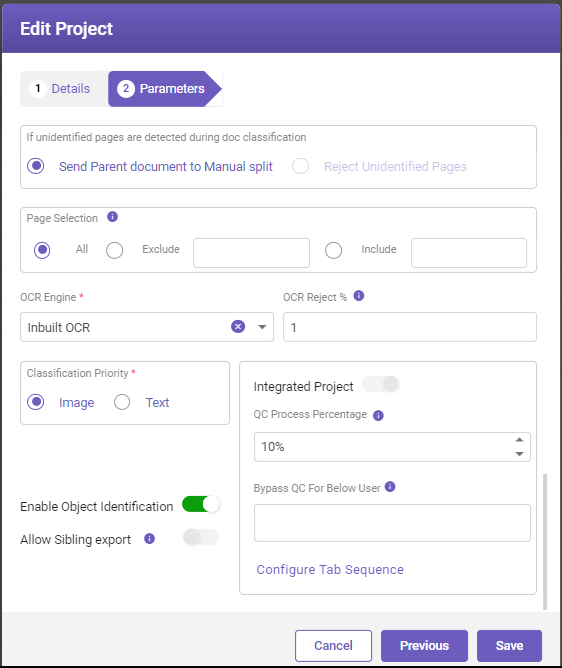
When you enable the Integrated Project toggle switch, then 3 new parameters appear such as QC Process Percentage, Bypass QC For Below User, and Configure Tab Sequence (see below image).
|
|
Indicates the percentage of documents to undergo quality check after MI. Note QC Threshold under the Parameters tab for the integrated subtypes will be disabled. |
|
|
Select the user to bypass the QC stage for the documents processed by the selected user and move directly to the export stage after MI. You can also select multiple users. |
|
|
This feature allows you to arrange the sequence of the tabs to be displayed on the MI page. Note To use this feature, you need to create subtypes for the project. A message (see the image below) is displayed if subtypes are not added for the project.
For more information on using this feature, refer How to use Configure Tab Sequence feature? |
|
|
Enable Object Identification |
Enable the toggle switch to identify objects such as logos, signatures, etc. in documents. |
|
Enabling the toggle switch would allow the export of sibling documents even if other sibling documents being ready for export. |
|
|
Auto Purge Mode |
Select the required option from the drop-down list to auto purge documents. Available options are as follows:
|
|
* Mandatory fields |
|

Click Previous to review or edit details under the Details tab or click Save to save the project.
Editing project
To edit project details, follow these steps:
-
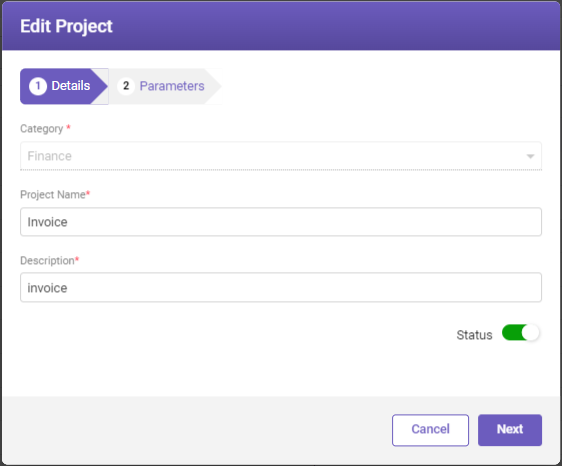
On the Project page, select the required category name whose details you need to modify and then click Edit button. The Edit Project window opens.

-
Modify the necessary details on the Details tab and then click Next.

-
Modify the necessary details according to your requirements on the Parameters tab and then click Save.
 How to use Configure Tab Sequence feature?
The Configure Tab Sequence feature allows you to arrange the sequence of the tabs to be displayed on the MI page.
Note:
-
If feature is visible when you enable the Integrated Project toggle switch.
-
This feature can be used only after creating a project and adding subtypes. i.e. while Editing a project.
To use the Configure Tab Sequence feature, perform the following steps:
-
Create an integrated project (See Adding project.)
-
Once you have created an integrated project, add subtypes for the project (See Adding document subtype.)
-
Upon adding the subtypes for the project, access the Project page and search for the created project using the search field (Refer searching data).
-
Select the required project and click the Edit button.
-
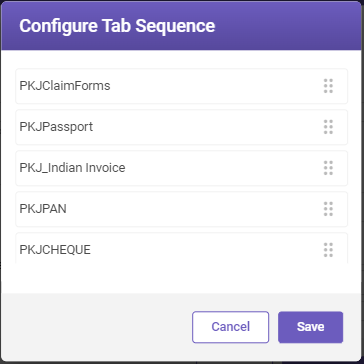
Go to the Parameters tab and click Configure Tab Sequence, the Configure Tab Sequence window opens. All the subtypes associated with the project are displayed (see the image below).

-
Change the sequence of the subtypes as per your requirement using the
 icon by dragging the selected menus up and down.
NEXT
Now that you have created a category, let's set up an ontology.
Useful links
Integrated documents processing.